Cabinet Drawer Face Replacement: A Complete Guide
Transform the look of your dresser, cabinet, or chest of drawers by replacing the drawer faces. Learn about materials, styles, measuring, and installation so you can refresh your storage furniture with confidence.
Explore the GuideWhy replace drawer faces? Replacing cabinet drawer faces is one of the most efficient ways to modernize a dresser or cabinet without replacing the entire piece. You keep the existing drawer boxes and slides, but update the visible front panels for a fresh look, better durability, or a new style direction that fits your bedroom.
What Is Cabinet Drawer Face Replacement?
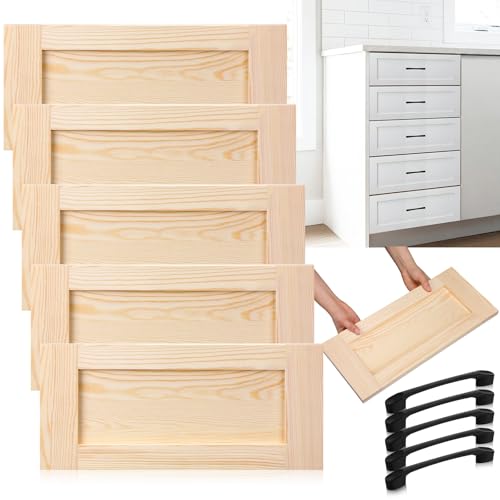
Cabinet drawer face replacement means removing the decorative front panel of a drawer — the part you see and pull — and installing a new drawer front in its place. The drawer box, runners, and cabinet frame usually stay intact. This approach is popular for dressers, chests of drawers, bathroom vanities, and kitchen cabinets because it delivers a noticeable visual upgrade while keeping the structural components you already trust.
There are two main approaches. The first is a direct replacement, where you source new drawer fronts with the same dimensions and mounting pattern. The second is a custom retrofit, where you measure the opening and attach new faces using new hardware or an adapter. Both approaches can work well depending on the condition of your existing cabinet and the style you want to achieve.
Why Upgrade Your Drawer Faces?
Drawer faces take the most visual wear in any dresser. They are touched daily, exposed to light, and often show scratches, peeling veneer, or outdated finishes. Replacement gives you a clean slate without the disruption of buying and assembling a whole new unit.
- Style refresh: Switch from a dated flat panel to a shaker, beaded, or slab front that matches your current bedroom aesthetic.
- Material upgrade: Move from thin engineered panels to solid wood or high-grade plywood for better durability.
- Color and finish change: A new face lets you introduce a painted or stained finish without refinishing the entire cabinet body.
- Hardware alignment: New faces let you reposition pulls and knobs for a cleaner, more balanced look.
- Damage repair: Water damage, dents, or failed veneer on the original faces can be solved with replacement rather than patchwork.
If your drawer boxes and slides are still solid, replacing the faces is a sensible, long-term investment in the furniture you already own. You can learn more about matching fronts and doors in our guide to cabinet doors and drawer fronts.
Types of Replacement Drawer Faces
Drawer faces come in several construction styles and profiles. Understanding the options helps you choose a replacement that fits both the cabinet and your design goals.
Slab (Flat) Fronts
Slab fronts are flat panels with no frame or profile. They are the most common choice for modern and minimalist dressers. Slab fronts are straightforward to measure and install, and they work well with bar pulls or edge pulls. They are available in painted MDF, veneered plywood, and solid wood.
Shaker and Five-Piece Fronts
Shaker-style fronts use a flat center panel surrounded by a raised frame. This is a classic profile that suits farmhouse, transitional, and traditional bedrooms. Five-piece fronts are assembled from separate rails, stiles, and a center panel, which gives them a durable, furniture-grade feel.
Beaded and Raised-Panel Fronts
Beaded fronts have a decorative groove along the frame, while raised-panel fronts feature a center panel that is thicker in the middle. These profiles add depth and shadow lines, making them a good match for period-inspired or formal dressers.
Glass and Specialty Fronts
Some dressers and cabinets use glass-front drawers for display or a lighter visual weight. Specialty fronts may also include metal, rattan, or cane inserts. These options can be harder to source as direct replacements, so custom fabrication is often required.
| Front Style | Best For | Construction Notes | Typical Tier |
|---|---|---|---|
| Slab / flat panel | Modern, minimalist, Scandinavian | Single panel, painted or veneered | Entry-level to mid-range |
| Shaker five-piece | Farmhouse, transitional, traditional | Rails, stiles, and center panel | Mid-range to premium |
| Beaded profile | Classic, cottage, period-inspired | Grooved frame, often solid wood | Mid-range to high-end tier |
| Raised panel | Formal, traditional, luxury bedrooms | Thicker center panel with profile | Premium to luxury |
| Glass / specialty | Display drawers, accent cabinets | Insert-based, often custom | Custom / professional-grade |
Choosing the Right Material
The material of your replacement drawer face affects durability, weight, finish options, and how well the face holds hardware. Most replacement faces fall into three broad material categories.
Solid Wood
Solid wood faces offer the most authentic grain and can be sanded and refinished over time. Oak, maple, walnut, and cherry are common choices. Solid wood is a long-term investment and tends to hold up well in high-use dressers. However, solid wood can expand and contract with humidity, so acclimating the panels before installation is important.
Engineered Wood and MDF
Medium-density fiberboard (MDF) and engineered panels are stable, smooth, and excellent for painted finishes. They do not have grain movement, which makes them predictable for slab fronts. High-grade MDF with a proper primer and topcoat can be very durable, especially for painted shaker profiles.
Plywood and Veneer
Plywood with a veneered face is a balanced middle ground. The core is stable, and the veneer provides a real wood look. This is a common construction for mid-range replacement fronts. Pay attention to edge banding quality — well-finished edges are a sign of careful manufacturing.
Whichever material you choose, check the panel thickness. Standard drawer faces are often around 3/4 inch, but thinner panels are common on entry-level furniture. Matching the original thickness helps the new face sit flush with the cabinet frame. For heavy drawer boxes, a reinforced face can improve the feel of the pull and reduce flex.
How to Measure for Replacement Drawer Faces
Accurate measurement is the single most important step in drawer face replacement. A face that is even slightly off can rub against the cabinet, sit crooked, or leave uneven gaps. Follow a consistent method and double-check every number.
- Remove the existing face. Take the old drawer front off the drawer box. Keep the screws and any spacers in a labeled bag so you can reference the original mounting pattern.
- Measure the face itself. Measure the width and height of the old face at its widest points. Write down both dimensions and note any bevels or edge profiles.
- Measure the cabinet opening. Measure the opening where the drawer sits. This helps you decide whether the new face should be overlay (covering the frame) or inset (sitting inside the frame).
- Check the reveal and gap. Note the gap between the old face and the cabinet frame on all four sides. Consistent reveals are what make a replacement look factory-finished.
- Identify the mounting pattern. Measure the distance between the screw holes on the back of the old face. If the new face does not match, you will need to drill new holes or use an adapter plate.
- Confirm the hardware position. Measure the location of the pull or knob from the top and side edges. You will need these numbers to drill the new face accurately.
- Order with a small allowance if needed. For painted or unfinished faces, a small trimming allowance can be useful, but never order faces larger than the opening unless you plan to trim them.
If you are replacing faces on a dresser with unusual proportions, our guide to chest of drawers with large drawers covers how wide faces and heavy boxes affect the measurement and mounting approach.
Installation: Step-by-Step
Installing replacement drawer faces is a manageable project with basic tools. The key is to work one drawer at a time and test the fit before tightening everything down.
- Prepare the drawer box. Clean the front edge of the drawer box and remove old screws, staples, or adhesive residue. The new face needs a flat, clean surface to sit against.
- Mark the mounting holes. Use the old face as a template, or transfer your measurements to the back of the new face. Center-punch each hole to keep the drill bit from wandering.
- Drill pilot holes. Use a bit slightly smaller than your screws. Pilot holes prevent splitting, especially in MDF and solid wood.
- Attach the face loosely. Drive the screws partway so the face can still shift slightly. This lets you adjust the alignment before final tightening.
- Check the reveal. Close the drawer and inspect the gap around all four edges. Adjust the face left, right, up, or down until the gaps are even.
- Tighten and test. Tighten the screws fully and open and close the drawer several times. Listen for rubbing and check that the face does not contact the frame.
- Install the hardware. Drill for the pull or knob using the measurements you recorded earlier. A drill guide helps keep the holes perpendicular.
If your drawer slides are showing their age, replacing the faces is a good time to evaluate the running gear. Our guide to heavy-duty cabinet drawer slides explains how slide capacity and mounting style affect the feel of a refreshed drawer.
Matching Drawer Faces to Your Dresser Style
The right face profile depends on the overall design of your dresser or cabinet. A face that looks great in isolation can feel out of place if it fights the cabinet frame or the room's style.
Modern and Minimalist
Choose slab fronts with tight reveals and simple bar pulls. Painted MDF or veneered plywood works well here. Keep the hardware minimal and aligned for a clean look. If you are updating a modern dresser, our bureau drawer guide covers how drawer proportions affect the overall visual balance.
Farmhouse and Transitional
Shaker five-piece fronts are the natural choice. Painted finishes in soft neutrals pair well with cup pulls or simple knobs. Consistency across all drawers is important — mixed profiles can make a dresser look patched together.
Traditional and Formal
Beaded or raised-panel fronts add depth and shadow lines. Wood tones such as cherry, walnut, or mahogany suit formal bedrooms. Hardware with a classic profile completes the look. For a broader look at proportion and placement, see our tall chest of drawers guide.
Accent and Specialty Pieces
Glass or cane inserts can work on accent cabinets and display drawers. These are usually custom items, so plan extra lead time and confirm the insert dimensions before ordering. Our cabinet with drawers and doors guide explains how mixed storage configurations affect face sizing.
Common Mistakes to Avoid
- Measuring the opening instead of the face. The new face must match the old face dimensions, not the cabinet opening, unless you are intentionally changing the overlay style.
- Ignoring the mounting pattern. If the new face does not align with the drawer box holes, you will need to drill new holes. Plan for this before installation day.
- Mixing panel thicknesses. A face that is too thin can flex; one that is too thick can rub. Match the original thickness whenever possible.
- Skipping pilot holes. Drilling without pilot holes risks splitting MDF and cracking solid wood, especially near the edges.
- Over-tightening screws. Over-tightening can dimple the face and distort the drawer box. Snug is enough; the screws are not structural clamps.
- Forgetting hardware alignment. A pull that is slightly off-center is immediately noticeable. Measure twice and use a drill guide.
Frequently Asked Questions
Can I replace drawer faces without replacing the drawer box?
Yes. In most cases, the drawer box and slides stay in place. You remove the old face, measure the mounting pattern, and attach the new face to the existing box. This is the core advantage of cabinet drawer face replacement.
Do replacement drawer faces come pre-drilled?
Some do, but most are sold undrilled so you can match your existing hardware and mounting pattern. Undrilled faces give you more flexibility but require careful measuring and pilot holes.
What is the best material for a replacement drawer face?
It depends on the finish and use. Solid wood offers the best long-term durability and refinishing potential. Painted MDF is stable and smooth for slab and shaker profiles. Veneered plywood is a balanced mid-range option with a real wood look.
How do I match the reveal on all drawers?
Attach each face loosely first, close the drawer, and adjust the face until the gap is even on all four sides. Then tighten the screws. Working one drawer at a time and checking the reveal before final tightening keeps the spacing consistent.
Can I change the style of my drawer faces?
Yes. You can switch from a flat front to a shaker or beaded profile as long as the new face fits the opening and the mounting pattern works. Just confirm the panel thickness and hardware position so the finished drawer operates smoothly.
Is drawer face replacement suitable for antique dressers?
It can be, but antiques often have non-standard dimensions and hand-cut joinery. Measure carefully and consider keeping the original faces if the piece has historical value. For period pieces, a custom fabrication approach is usually the safest route.
Ready to refresh your dresser or cabinet? Browse our recommended drawer faces and hardware options to find the right fit for your project.
View Recommended Options