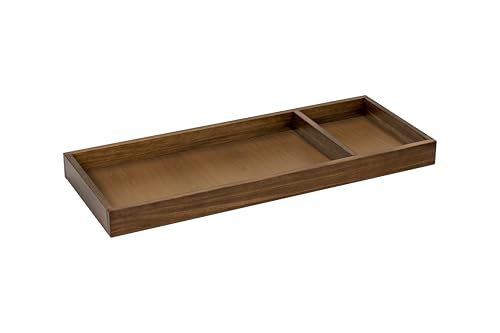
Removable Changing Tray for Dresser: The Complete Guide
Learn how a removable changing tray turns your nursery dresser into a safe, space-saving changing station — and what to look for before you buy.
What Is a Removable Changing Tray?
A removable changing tray is a shallow, raised platform that sits on top of a standard dresser and holds a contoured changing pad. Unlike a dedicated changing table, it is not permanently attached — most models rest on the dresser surface with non-slip feet, safety straps, or a low lip that keeps the tray from sliding. When the diaper stage ends, the tray lifts off in seconds and the dresser goes back to being a dresser. Many parents pair a tray with a nursery dresser that already includes a changing station, but a standalone removable tray is the more flexible option because it fits a wider range of furniture.
The concept is simple, but the details matter. A good tray keeps the pad stable, contains messes within a washable border, and never creates a tip-over risk. A poor one slides, wobbles, or leaves gaps where small hands can get pinched. The sections below break down exactly what to check.
Key Benefits of a Removable Design
Space Efficiency
One piece of furniture handles both changing and clothing storage — ideal for small nurseries and apartments where every square foot counts.
Long-Term Use
When the changing years are over, remove the tray and the dresser continues to serve for years as a standard bedroom piece.
Easy Cleaning
Lift the tray off and wipe it down, or carry it to the sink. No need to clean around a permanently mounted changing surface.
Flexible Placement
Move the tray between rooms or reposition it as your nursery layout changes. Some families keep one tray and rotate it between dressers.
Safety First: What to Verify Before Buying
Safety is the single most important factor with any changing surface. A removable tray must be stable enough that a wriggling baby cannot shift it, and the dresser beneath it must be anchored to the wall. Use this checklist:
- Anti-slip base: Rubber or foam feet, or a textured underside, keep the tray from sliding on smooth dresser tops.
- Safety straps or attachment points: Look for straps that secure the tray to the dresser, or a design with a raised lip that locks into place.
- Contoured pad with a safety belt: The pad should have raised sides and a waist belt — always use the belt, even for a moment.
- Wall-anchored dresser: The dresser itself must be tethered to the wall with an anti-tip kit. A tray does not replace this requirement.
- No sharp edges or pinch points: Check the tray's rim and any folding hinges for gaps that could catch fingers.
- Weight and height limits: Most trays are rated for infants up to a specific weight; stop using the tray once your child approaches that limit or begins to roll or push up.
If you are choosing a dresser specifically for this purpose, review our nursery dresser guide for models with reinforced tops and included safety hardware. A dresser with a flat, level top and a depth of at least 16 inches works best with most removable trays.
Sizing: Matching the Tray to Your Dresser
Fit is where most buyers go wrong. A tray that overhangs the dresser edge can tip, and one that is too small leaves the pad unstable. Measure your dresser top before shopping:
- Depth: The tray should match or be slightly shallower than the dresser depth — never deeper than the top surface.
- Width: Leave a small margin on each side so the tray sits fully supported; avoid trays wider than the dresser.
- Pad size: Standard contoured pads are typically 16 × 32 inches; confirm the tray is designed for the pad size you plan to use.
- Clearance: Check that the tray does not block drawer pulls or prevent the top drawer from opening fully.
If your dresser is on the smaller side, look at small dressers paired with a compact tray, or consider a dresser with a built-in changing area such as an off-white changing table dresser.
Materials, Build Quality, and Market Tiers
Removable changing trays fall into a few broad quality tiers. Instead of focusing on numerical figures, compare tiers to understand what you gain as you move up:
| Tier | Typical Build | Best For |
|---|---|---|
| Entry-level | Lightweight molded plastic or thin MDF; basic non-slip feet; pad often sold separately. | Short-term use, secondary changing spots, tight budgets where the tray is temporary. |
| Mid-range | Solid wood or engineered wood with a painted or laminated finish; rubber feet; included contoured pad and safety belt. | Everyday nursery use where durability and a stable fit matter. |
| Premium | Solid hardwood construction, smooth sanded edges, reinforced attachment straps, washable fabric pad cover. | Families planning multiple children or wanting the tray to double as a long-term dresser topper. |
| Luxury / high-end tier | Hardwood with hand-finished details, custom-fit design for specific dresser lines, premium water-resistant pad materials. | Coordinated nursery sets and buyers who want a seamless furniture match. |
Whichever tier you choose, prioritize a stable base and a washable surface. A mid-range tray with a solid build and good attachment hardware is generally a stronger choice than an entry-level tray with extra accessories.
Features Worth Prioritizing
- Raised safety lip: A perimeter lip contains spills and prevents the pad from shifting.
- Washable pad cover: Removable, machine-washable covers make middle-of-the-night changes far easier.
- Storage nooks: Some trays include side compartments for diapers, wipes, and cream — handy but not essential.
- Tool-free installation: The best trays lift on and off without screws, so you can convert the dresser quickly.
- Neutral finish options: White, natural wood, and soft gray finishes blend with most nursery palettes.
If you are still assembling the rest of the nursery, pair your dresser and tray with a coordinated nursery wardrobe set to keep the room visually consistent.
How to Choose: A Step-by-Step Approach
Buyers researching this product usually already know they want a removable tray — the question is which one. Work through these steps in order:
- Step 1 — Measure your dresser top (width, depth, and height from floor). Note drawer pull positions.
- Step 2 — Decide on pad inclusion. Some trays ship with a contoured pad; others require a separate purchase. Confirm compatibility.
- Step 3 — Check attachment method. Prefer straps or locking lips over friction-only designs.
- Step 4 — Confirm the dresser is anchor-ready. If it is not, add an anti-tip kit before installing the tray.
- Step 5 — Review the finish and materials for ease of cleaning and match with your nursery style.
- Step 6 — Plan the transition. Know the weight and mobility limits so you can remove the tray at the right time.
Frequently Asked Questions
Ready to Compare Options?
Browse recommended removable changing trays and nursery dressers in the product section below. Compare features, tiers, and attachment styles before you decide.
Final Thoughts
A removable changing tray for dresser is a practical, space-smart solution that adapts as your child grows. Choose a tray with a stable base, a contoured pad with a safety belt, and an attachment method you trust — and always anchor the dresser to the wall. Get those fundamentals right, and you will have a changing station that serves you well during the nursery years and disappears cleanly when it is no longer needed. If you are furnishing the full room, explore our broader nursery dressers collection to find a dresser that pairs perfectly with your chosen tray.